Léonard Urban

Here I post longer form content. Main mastodon account: @leonardurban@tooting.ch

Now that I am back from vacation, I managed to get a few things done ! Here is a list of the key areas I managed to make progres in: 1. Project managment, to have a better overview of what was done and what I need to achieve; 2. A smarter packaging system to manage multiple sensors at once; 3. Reducing memory usage by implementing static FlatBuffers using a custom emitter.

1. Project Managment

First, I finally took the time to look into project managment software, and stumbled on Kaneo, a rather minimal kanaban application that also includes a backlog and a Gantt chart. I wanted something that was easy to self-host (there is a Dokploy template for it) and a small enough featureset I wouldn't waste time learning how to use it. Now, if you want to follow the project's development, you can take a look at my kanban board !

Visually writing down what has to be done and has already been done helps me to prioritize certain features over others, and helps me stay motivated by seing the steady progress, so I am glad I finally took the time to configure everything.

2. Smarter packaging

Before, every single sensor provided its own _pack() function. This function was used to take as all the data that the sensor had accumulated since the last _pack() call and add it to the common Flatbuffer. Then, a central telemetry task would call the _pack() functions sequentially and then finally send out the final, serialized packet.

While this worked for testing purposes, it came with several issues: + It required to write extremely similar code each time I added a new sensor; + There was no check wether the packaged data exceeded the remaining available space; + Starvation was guaranteed since the sensors would alwas package in the same order.

The first issue was kind of fixed by using a large macro that could automatically generate the _pack() function for you, but the two other issues remained. To fix them, I decided to throw away this implementation to switch to a sensor-agnostic implementation with a priority system.

Generalizing the packaging

In FlatBuffer (specifically flatcc), you would typically use specialized functions for each datatype defined in your .fbs schema. To be able to handle any sensor, we use the underlying flatcc_ functions. These typically abstract away the datatype to an id, alignment and size variables. This enables us to register a sensor to the telemetry system by providing only three values, instead of providing a whole function, simplifying the work of the user.

Now we have a generic_pack() function to use instead of the ~10 individual pack functions. Since this generic function is provided by the telemetry task and not the sensor task, it has also much more context allowing for more granular control of how the data gets packaged.

Data from the sensors is appended using this (simplified workflow):

flatcc_builder_start_vector(B, size, alignment, max_count); // prepare to build scrap vector in heap
flatcc_builder_append_vector(B, byte_buf + (start_idx * size), count); // copy section of sensor data to the scrap vector
flatcc_builder_ref_t vec_ref = flatcc_builder_end_vector(B); // get offset of built scrap vector
flatcc_builder_ref_t* table_slot_ref = flatcc_builder_table_add_offset(B, id); // get offset of the sensor's final vector
*table_slot_ref = vec_ref; // map the scrap vector to the sensor's final vector
// repeat the above steps for each sensor, each with its own size, alignment and id
FripuckProtocol_Sensors_SensorBatch_end_as_root(B); // finaly commit the full FB

Currently those three values have to be digged up in the generated flatcc files, which is not ideal. In theory, these values can be calculated or referenced in the generated code, which would be ideal in the long run.

Priority System

To reduce starvation, and make sure time sensitive data gets priority, a priority system was made. A priority and age is assigned to each sensor when registering them, to determine the order in which the sensors get packaged, and thus which one can package the most data. That process is rather simple, simply adding age_step to the age of the sensor at each iteration to track how much time has passed since last data was sent, and then adding the age to the priority for the final priority. The sensor which gets the highest priority gets picked next.

This system prevents starvation but isn't optimal. Ideally, taking into account how much data the sensor has collected or what would optimally fill the FB packet would also be interesting metrics to determine the priority, but this simple system currently is sufficient for my needs.

Puting it all together

With these two new systems as well as a limit tracker, we can now create a simple packaging loop to package and send our data:

void pack_loop(flatcc_builder_t* builder, uint32_t budget) {
    for (; budget > 0;) {
        // Priority check
        struct sensor_info* s = update_age_and_pick_sensor();
        if (s == NULL) continue;

        // Managing the remaining space and packaging the sensor data.
        uint32_t bytes_written = 0;
        generic_pack(builder, &s->fb_data, budget, &bytes_written);
        budget -= bytes_written;
    ...

Adding to that a simple timeout that will not block the pack_loop when only few or slow sensors are running, and we have a much better system than before ! However, this doesn't solve our initial problem of high memory use, which requires the next adaptation:

3. Static FlatBuffers

First, we need to understand how FlatBuffers works. Here is what it is according to the docs:

FlatBuffers is an efficient cross platform serialization library [...].

To achieve this serialization, flatcc (the C implementation of FlatBuffers) first creates the individual objects and vectors that go into the final FB object, and in a second step, it compacts down those individual blocks into a single, continuous memory block that is ready to be sent. A unique twist on the serialization is that instead of growing the sequential block in only one direction, it starts in the center of the available space (offset 0), and grows data to the left (negative offset) and metadata (the position and type of the data) to the right (positive) offset.

                  ┌───────┬────────┐
                  │   FB buffer    │ Emitter ctx
                  └───────┼────────┘
                    Data  │ Vtable (metadata)
 - negative offset ◄───── │ ─────► + positive offset
                          │
                       offset 0

One major issue when using the default flatcc configuration, is that it builds this serialized block in the heap, meaning we need to allocate a huge chunk of data on the heap when the serialization starts. Since we only have so much heap space to begin with, this is a no go.

Luckily for us, the flatcc developers go us coverd and provide a custom initialization command which enables us to provode our own emitter (the object responsible for building the serialized block). This way, we can assign a static buffer to it, which prevents fragmentation and doesn't reaquire a bunch of free heap space. It is also possible to define a custom allocator, which is used when creating the temporary vectors and objects before serializing them, but this is overkill for our needs.

The custom emitter is divided into three parts: – The emitter context (ctx), which holds all the data the emitter function needs to build the serialized buffer; – The emitter function (custom_builder_emit_fun), which is called each time an object or vector needs to be added to the final buffer, and appends the data and the metadata to the respective ends of the buffer; – And finally the buffer itself, where the data will be added.

We define the buffer as simply a static array of bytes, with a “center”. Typically the center (or offset 0) won't be perfectly in the center of the static buffer, since flatcc generally produces much more data (left side) than metadata/Vtable (right side)

#define STATIC_FB_BUFFER_SIZE (2 * 1024)                       // 2KB static payload buffer
#define FB_BUFFER_OFFSET_ZERO (STATIC_FB_BUFFER_SIZE * 3 / 4)  // Index of offset 0
static uint8_t fb_buffer[STATIC_FB_BUFFER_SIZE] = {0};

Then, we need to define the context which will be passed through different function calls. To be able to build the buffer and correctly determine its size, we need to store a reference to the buffer, its capacity, the offset of the center, the min and max offsets.

typedef struct {
    uint8_t* buf;
    size_t capacity;
    flatbuffers_soffset_t zero_offset;  // Center (offset +0) of the buffer
    flatbuffers_soffset_t min_offset;   // Tracks the lowest negative offset emitted
    flatbuffers_soffset_t max_offset;   // Tracks the highest positive offset emitted
} static_emitter_context_t;

Then begins the hard part, the emitter function. It has to strictly follow the following function definition:

int custom_builder_emit_fun(void* emit_context, 
                            const flatcc_iovec_t* iov, 
                            int iov_count, 
                            flatbuffers_soffset_t offset, 
                            size_t len);

Let's go through the different arguments: – emit_context is a pointer to the context we defined earlier. – iov is an array containing data+size pairs of information we need to copy to the buffer. – iov_count is the number of elements in that array. – offset is the offset (positive or negative) where we need to write the data to. – len is the combined length of all the iov entries.

Then, the workflow is pretty simple. 1. We loop through the iov entries, 2. We calculate the final address in the buffer where the data needs to be copied to, 3. Update the offset before writing the next entry.

In code, this translates to the following (omitting bound checks and details):

for (int i = 0; i < iov_count; ++i) {
    size_t elem_len = iov[i].iov_len;
    if (elem_len == 0) continue;

    // Calculate the final address to write to 
    uint8_t* dest = &ctx->buf[ctx->zero_offset + offset];

    // copy 
    memcpy(dest, iov[i].iov_base, elem_len);
    
    // update the entry
    offset += (flatbuffers_soffset_t)elem_len;
}

Then, simply pointing to the lowest negative offset gives you a valid FB, no additional steps !

Wrappingn it up


Now that I’m back from vacation, I’ve managed to make progress on several key areas: 1. Project management, to get a clearer overview of what’s done and what’s left to achieve; 2. A smarter packaging system to handle multiple sensors more efficiently; 3. Reducing memory usage by implementing static FlatBuffers with a custom emitter.

1. Project Management

First, I finally took the time to explore project management tools and came across Kaneo, a minimal Kanban application that also includes a backlog and a Gantt chart. I wanted something easy to self-host (there’s a Dokploy template for it) with a small enough feature set that I wouldn’t waste time learning how to use it.

If you want to follow the project’s progress, you can now check out my Kanban board!

Visually tracking what needs to be done and what’s already completed helps me prioritize features and stay motivated by seeing steady progress. I’m glad I finally set this up.

2. Smarter Packaging

Previously, each sensor had its own _pack() function. This function would take all the data the sensor had accumulated since the last _pack() call and add it to a shared FlatBuffer (FB). A central telemetry task would then call these _pack() functions sequentially and send out the final serialized packet.

While this worked for testing, it had several issues: – It required writing nearly identical code for each new sensor. – There was no check to ensure the packaged data didn’t exceed the available space. – Starvation was inevitable since sensors were always processed in the same order.

The first issue was partially fixed using a macro to auto-generate the _pack() function, but the other two remained. To address them, I decided to scrap this approach and switch to a sensor-agnostic implementation with a priority system.

Generalizing the Packaging

When using FlatBuffers, you typically use specialized functions for each datatype defined in your .fbs schema. To handle any sensor, we use the underlying flatcc_ functions, which abstract the datatype into an ID, alignment, and size. This allows us to register a sensor in the telemetry system by providing just these three values, instead of an entire function, simplifying the user’s work.

Now, we have a single generic_pack() function replacing the ~10 individual pack functions. Since this generic function is provided by the telemetry task rather than the sensor task, it has more context, enabling finer control over how data is packaged.

Sensor data is appended using this simplified workflow:

flatcc_builder_start_vector(B, size, alignment, max_count); // Prepare to build scrap vector in heap
flatcc_builder_append_vector(B, byte_buf + (start_idx * size), count); // Copy section of sensor data to the scrap vector
flatcc_builder_ref_t vec_ref = flatcc_builder_end_vector(B); // Get offset of built scrap vector
flatcc_builder_ref_t* table_slot_ref = flatcc_builder_table_add_offset(B, id); // Get offset of the sensor's final vector
*table_slot_ref = vec_ref; // Map the scrap vector to the sensor's final vector
// Repeat the above steps for each sensor, each with its own size, alignment, and ID
FripuckProtocol_Sensors_SensorBatch_end_as_root(B); // Finally commit the full FlatBuffer

Currently, these three values (ID, alignment, size) must be manually extracted from the generated flatcc files, which isn’t ideal. In theory, they could be calculated or referenced in the generated code, which would be a better long-term solution.

Priority System

To prevent starvation and ensure time-sensitive data gets priority, I implemented a priority system. Each sensor is assigned a priority and an age when registered. These determine the order in which sensors are processed and how much data they can package. The process is straightforward: at each iteration, age_step is added to the sensor’s age to track the time since its last data was sent, and then the age is added to the priority to compute the final priority. The sensor with the highest priority is selected next.

This system prevents starvation but isn’t perfect. Ideally, we’d also consider how much data a sensor has collected or how to optimally fill the FlatBuffer packet. However, this simple system currently meets my needs.

Putting It All Together

With these two new systems and a limit tracker, we can now create a simple packaging loop to package and send data:

void pack_loop(flatcc_builder_t* builder, uint32_t budget) {
    for (; budget > 0;) {
        // Priority check
        struct sensor_info* s = update_age_and_pick_sensor();
        if (s == NULL) continue;

        // Manage remaining space and package sensor data
        uint32_t bytes_written = 0;
        generic_pack(builder, &s->fb_data, budget, &bytes_written);
        budget -= bytes_written;
        ...
    }
}

Adding a simple timeout ensures the pack_loop doesn’t block when only a few or slow sensors are running. This results in a much better system than before. However, it still doesn’t address the initial problem of high memory usage, which brings us to the next adaptation:

3. Static FlatBuffers

First, let’s recap how FlatBuffers works. According to the docs:

FlatBuffers is an efficient cross-platform serialization library for C++, Java, Python, Go, and more.

Unlike traditional serialization formats (e.g., JSON or Protobuf), FlatBuffers does not serialize or deserialize data in the conventional sense. Instead, it directly constructs a binary buffer in memory, where data is organized for zero-copy access. This means you can read fields directly from the buffer without parsing or deserialization steps. To build this buffer, flatcc (the C implementation of FlatBuffers) follows a two-step process:

  1. It first creates intermediate vectors and tables (temporary structures) for each object defined in your .fbs schema.
  2. It then compacts these into a single, contiguous memory block ready for transmission. A unique aspect of FlatBuffers is its bidirectional growth mechanism. Instead of growing the buffer in one direction, it starts at the center (offset 0) and grows:
  3. Data (e.g., vectors, scalars) toward negative offsets (left).
  4. Metadata (e.g., VTables, which store field layouts for tables) toward positive offsets (right). This minimizes alignment gaps and ensures the final buffer is tightly packed.
                  ┌───────┬────────┐
                  │   FB buffer    │ Emitter ctx
                  └───────┼────────┘
                    Data  │ Vtable (metadata)
 - negative offset ◄───── │ ─────► + positive offset
                          │
                       offset 0

But why does it matter ? By default, flatcc allocates this final buffer on the heap, which is problematic for embedded systems with limited memory. Fortunately, flatcc allows us to provide a custom emitter—a callback function that redirects buffer construction to a static memory region of our choosing. This avoids dynamic allocation entirely. It’s also possible to define a custom allocator for temporary vectors and objects before serialization, but that’s overkill for our needs.

The custom emitter consists of three parts: – The emitter context (ctx), which holds all the data the emitter function needs to build the serialized buffer. – The emitter function (custom_builder_emit_fun), called each time an object or vector needs to be added to the final buffer. It appends data and metadata to their respective ends of the buffer. – The buffer itself, where the data is stored.

We define the buffer as a static byte array with a “center.” Typically, the center (offset 0) isn’t perfectly centered in the static buffer, as flatcc usually generates more data (left side) than metadata/vtable (right side):

#define STATIC_FB_BUFFER_SIZE (2 * 1024) // 2KB static payload buffer
#define FB_BUFFER_OFFSET_ZERO (STATIC_FB_BUFFER_SIZE * 3 / 4) // Index of offset 0
static uint8_t fb_buffer[STATIC_FB_BUFFER_SIZE] = {0};

Next, we define the context passed through function calls. To build the buffer and correctly determine its size, we need to store a reference to the buffer, its capacity, the center offset, and the min/max offsets:

typedef struct {
    uint8_t* buf;
    size_t capacity;
    flatbuffers_soffset_t zero_offset;  // Center (offset +0) of the buffer
    flatbuffers_soffset_t min_offset;   // Tracks the lowest negative offset emitted
    flatbuffers_soffset_t max_offset;   // Tracks the highest positive offset emitted
} static_emitter_context_t;

Now, the tricky part: the emitter function. It must strictly follow this definition:

int custom_builder_emit_fun(void* emit_context,
                            const flatcc_iovec_t* iov,
                            int iov_count,
                            flatbuffers_soffset_t offset,
                            size_t len);

Let’s break down the arguments: – emit_context: A pointer to the context we defined earlier. – iov: An array containing data+size pairs of the information to copy to the buffer. – iov_count: The number of elements in that array. – offset: The offset (positive or negative) where the data should be written. – len: The combined length of all iov entries.

The workflow is straightforward: 1. Loop through the iov entries. 2. Calculate the final address in the buffer where the data should be copied. 3. Update the offset before writing the next entry.

In code, this looks like (omitting bounds checks and minor details):

for (int i = 0; i < iov_count; ++i) {
    size_t elem_len = iov[i].iov_len;
    if (elem_len == 0) continue;

    // Calculate the final address to write to
    uint8_t* dest = &ctx->buf[ctx->zero_offset + offset];

    // Copy
    memcpy(dest, iov[i].iov_base, elem_len);

    // Update the offset
    offset += (flatbuffers_soffset_t)elem_len;
}

Once all data is written, the lowest negative offset points to the start of a valid FlatBuffer—no further processing needed!


Wrapping Up

While I haven’t been able to work on the project as much as I’d have liked, I’m glad to see it moving forward again. I’m also happy to see my memory issues disappear, hopefully for good 😅.

Over the next month, I’ll try to dedicate as much time as possible to the project. Right now, I’m focusing my efforts on getting the camera to work and laying the initial foundations for the laptop → e-puck commands. This involves coordinating the radio and controller chip, as well as the Lua VM I’ve started implementing.

C you next month!

Project Github page: https://github.com/Uhrbaan/fripuck2

Over the last two months, I was busy with my exam sessions and wasn’t able to make as much progress as I would have liked. However, I did start planning a smarter serialization approach for sensor data. Currently, all samples are packed one after another, which causes FlatBuffers to use too much RAM. The core idea is to track how much data has been packed so far and use a priority system to decide which packets get packed first. I don’t have much to show yet, though.

During that time, I also met with my professors to discuss the project, which forced me to clarify what I want to achieve with Fripuck. I identified four key improvements I could bring:

  • Data analysis
  • Networking
  • Asynchronous API
  • On-board programming

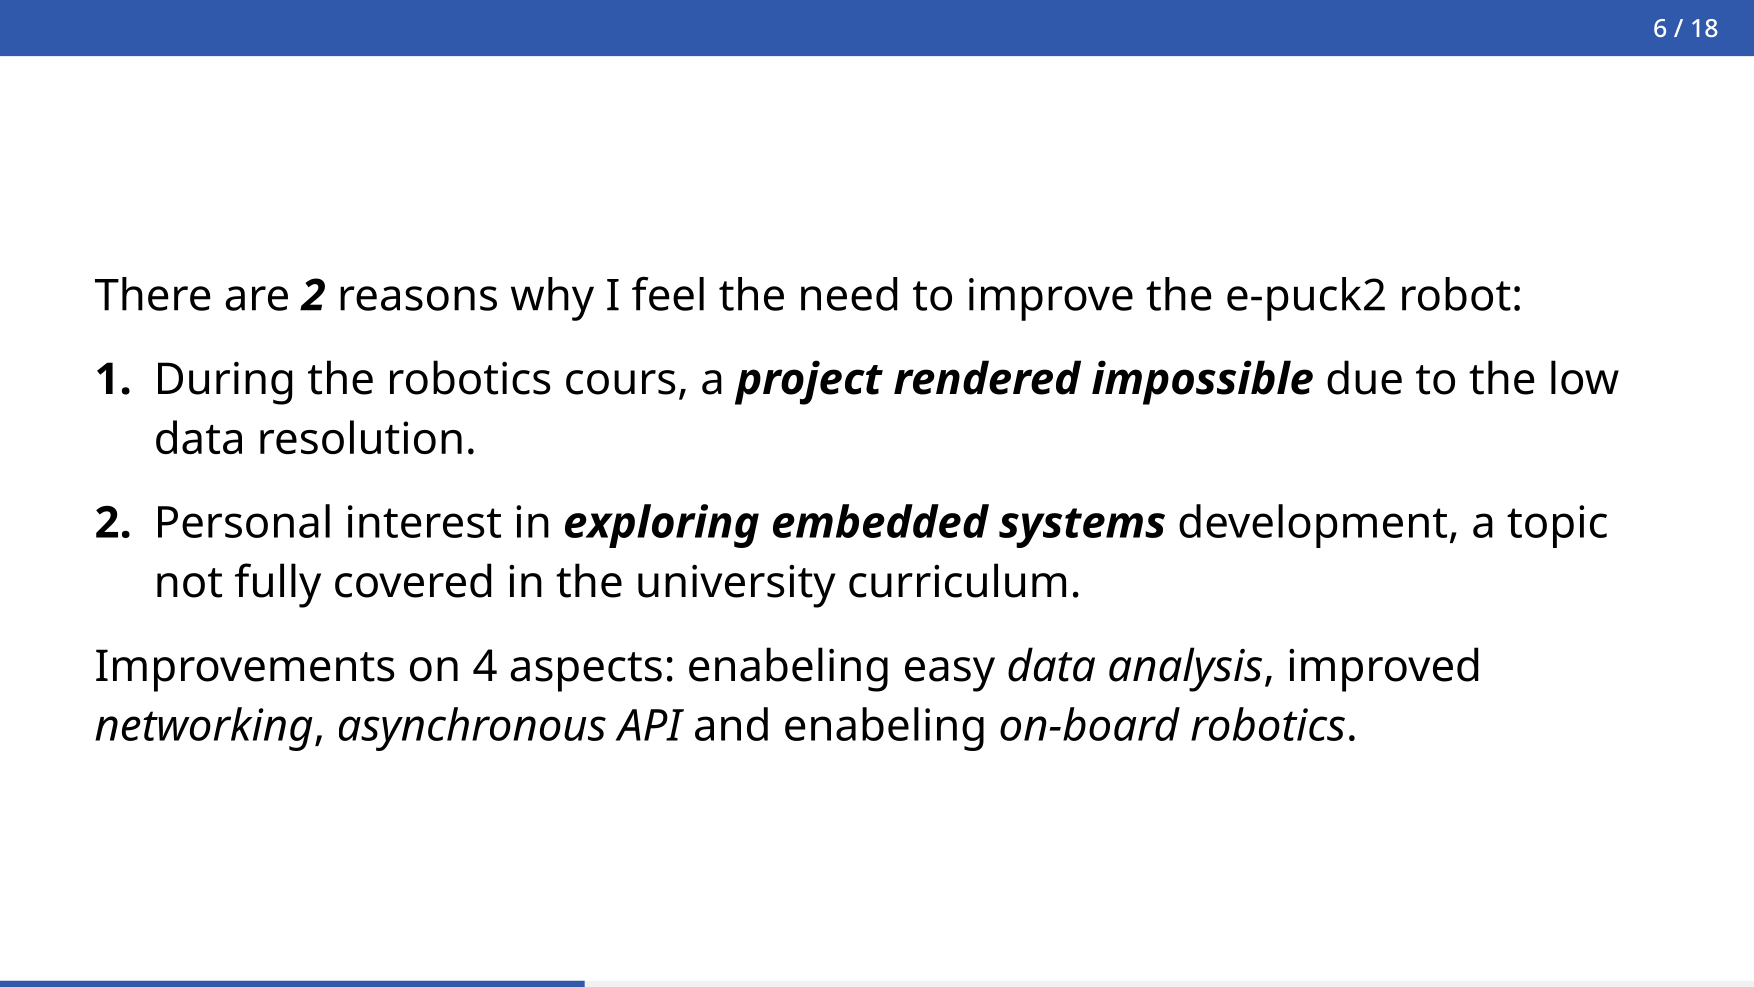
Slide from my presentation explaining why I am working on the project. It reads: There are 2 reasons why I feel the need to improve the e-puck2 robot: 1. During the robotics course, a project was rendered impossible due to low data resolution. 2. Personal interest in exploring embedded systems development, a topic not fully covered in the university curriculum. Improvements on 4 aspects: enabling easy data analysis, improved networking, asynchronous API, and enabling on-board robotics.

Data Analysis

The current API and firmware for the robot focus on real-time data, and it is up to the user to store and analyze it. My goal is to allow the firmware to save multiple data points in batches and send them at once, providing higher time resolution. The API would then store this historical data, allowing users to query it.

Improved Networking

A major annoyance when working with the robot is unstable networking. When 10 students work simultaneously on 10 different robots, the network can fail. The new API should be able to reconnect the robot as quickly as possible to avoid disrupting the user.

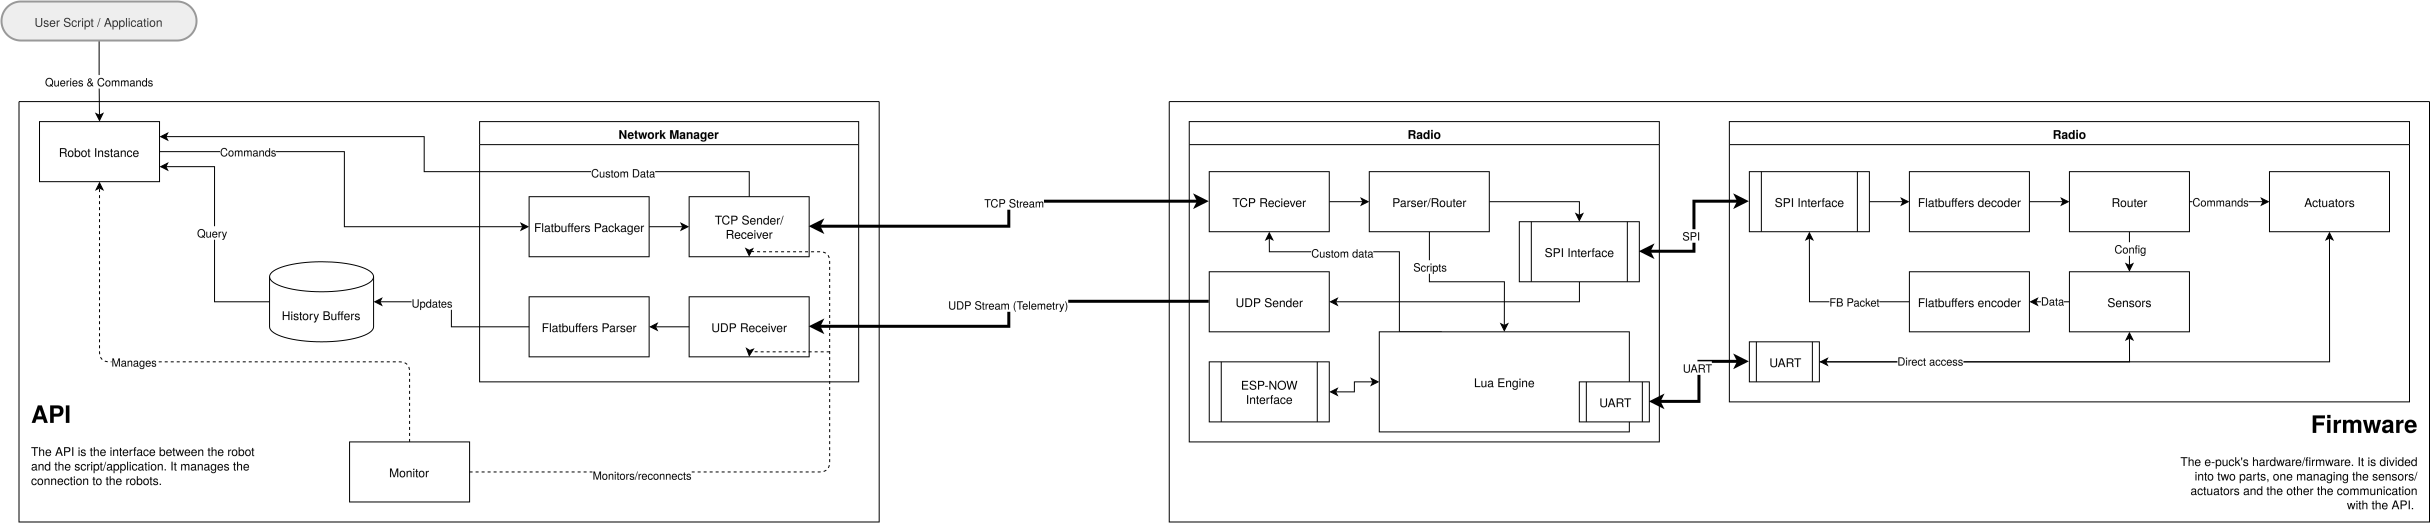
Planned structure for the firmware/API

Asynchronous API

This is another step toward improving time resolution. Currently, the Python API used to communicate with the robot relies on a single .go_on() call that sends instructions and waits for sampled data. This causes the program to spend most of its time waiting for a network response, making the robot feel unresponsive. My goal is to make data exchange happen in the background so it doesn’t interfere with the user’s code. I also want to decouple the sending and receiving of data.

On-board Robotics

Currently, the robot can only be controlled remotely, or the user must modify the robot’s firmware (which is not suitable for the target audience). I would like to add a small on-board interpreter, likely using Lua (since it is lightweight and easy to embed), to configure the robot and execute simple commands. This would allow users to change robot-specific features without recompiling the firmware or let students test latency when running scripts on-board or over the network.


Going Forward

This summer, I’ll have plenty of time to work on this project and, hopefully, complete 80% of it. Right now, the most urgent tasks are to configure my new OS (I distro-hopped to openSUSE) and create a roadmap of the features I need to implement. On the academic side, I need to identify measurable goals to evaluate the success of my project.

This month I've been quite busy with University work and had less time to focus on Fripuck. Still, I've managed to add new sensors and solve some pesky errors !

New sensors

The e-puck2 robot is equipped with a ring of 8 proximity sensors (IR reflectors). I followed the architecture of the previous implementation. It cleverly turns the IR ligths of the sensors on and off at specific time intervals to limit interference and measure the ambient light levels.

This is a significant step-up of my previous implementation, which kept the IR lights always on and scanned the sensors continuously. Not only did this produce interference in the results, but also increased power consumption.

This month also brought three sensors living on the I²C connection: the Time-of-Flight (ToF), the Inertial Measurement Unit (IMU) and the ground sensors.

I²C stability issues

I²C is a communication protocol where a master can communicate to multiple slave on the same wire. On the e-puck2, three sensors are configured and transfer their data over I²C: the ToF, IMU and ground sensors.

At first, the I²C connection seemed to work for the ToF, but wouldn't for the other sensors, always returning HAL_BUSY error. Looking online, I found that I²C can be quite unstable on some STM chips, especially when using the standard HAL_I2C_Mem_Read/Write functions. I decided to copy the implementation of the vl53l0x ToF api code, which used the HAL_I2C_Master_Receive/Transmit functions directly.

Here is how my custom 2c_read/write_reg was implemented, if it can be of use for anyone:

HAL_StatusTypeDef i2c_read_reg(uint8_t dev_addr, uint8_t reg, uint8_t *buffer, uint16_t len)
{
    HAL_StatusTypeDef res;
    osMutexAcquire(i2c_mutex, osWaitForever);

    // Announce which device/register will be sent to
    res = HAL_I2C_Master_Transmit(i2c_handle, (dev_addr << 1), &reg, 1, 100);

    if (res == HAL_OK)
    {
        // Recieve data from the slave
        res = HAL_I2C_Master_Receive(i2c_handle, (dev_addr << 1), buffer, len, 100);
    }

    osMutexRelease(i2c_mutex);
    return res;
}

HAL_StatusTypeDef i2c_write_reg(uint8_t dev_addr, uint8_t reg, uint8_t *buffer, uint16_t len)
{
    // Local buffer to combine reg + data
    uint8_t tmp[len + 1];
    tmp[0] = reg;
    memcpy(&tmp[1], buffer, len);

    osMutexAcquire(i2c_mutex, osWaitForever);
    HAL_StatusTypeDef res = HAL_I2C_Master_Transmit(i2c_handle, (dev_addr << 1), tmp, len + 1, 100);
    osMutexRelease(i2c_mutex);

    return res;
}

Python API

The python API now internally exposes an Abstract Base Class that makes it very easy to implement the reception of new sensor data. This framework has been used to implement all the sensor management in the python API, significantly reducing code duplication.

What's next ?

Next month, I'll be working more on my upcoming exams, so it will probably be a quite uneventful month.

In the available time I have, I will try to come op with a good priority system to manage which sensor data gets packaged when and sent. Currently, if I let too many sensors run at once, the Flatbuffers packet will consume so much ram that the program crashes. My objective is to smartly cut up the incoming data streams to control the final size of my Flatbuffers packet and make sure no streams are getting starved.

Wrapping up

While this month didn't bring as many features as I would have hoped, I am still happy with what I achieved considering the limited amount of free time at my disposal. I am also pleased to see the I²C issue fixed, which has been bothering me for some time now.

Hi there 👋 I'm Uhrbaan, and for my bachelor thesis, I am working on updating the e-puck2's codebase and API to better fit the needs of my university.

This blog serves as a monthly update on the progress I make on that project over the next year.

What is the e-puck ?

The robot was designed by the EPFL, who describe them the following:

The e-puck is an educational robot that helps generations of students learn about embedded systems and robotics. First developed at EPFL in 2004 by Francesco Mondada and Michael Bonani, a new version was released in 2018, produced by GCtronic in Ticino. [source]

Essentially, they are small robots equipped with many small sensors to help students make their first steps into mobile robotics.

The e-puck2 robot and its many sensors

The e-pucks used at my university are built and maintained by GCtronic, a small Ticinese company. They are also the authors of the main code running on these robots and also produced a C API to talk to the robots over the network. This API was later replaced by a Python API made by a university student during their bachelor thesis (just like me), which later also introduced computer vision capabilities through YOLO.

What is Fripuck ?

Fripuck is my addition to this educational tool (if it works out 😅) ! The idea to work on the e-puck2 as my bachelor thesis rose out of two frustrations I encountered while working with the robots: (1) the blocking nature of the API and (2) the focus on real-time robotics, limiting the ability for data analysis/signal processing.

Good software is born of frustration

— Someone, probably

A second reason I started this project, and why I am not only modifying/rewriting the API but also the firmware, is that I got really interested in embedded development. The university sadly doesn't have courses about embedded programming, so I figured the best I could do was learn that subject on my own, and with my limited time, doing it during my bachelor thesis seemed to be the best option.

Fripuck itself is the combination of three pieces of software: the firmware of the STM32F4 chip that controls the robot and all the sensors, the firmware of the ESP32 responsible for the communication over Wi-Fi with the student's computer, and finally the API (Python or Go for testing). The name of the project is a combination of e-puck and Fribourg, the university with which I am doing my thesis.

What do I want to achieve? I technically already started the project last semester, so about 4 months ago, just as an “exploratory” phase. This helped me to read a bit through the existing code base, get familiar with the hardware, and explore the limitations of the chip. For example, I got a Lua VM working on one of the two chips and controlling the LEDs with it.

For the moment, I am mostly working on re-implementing the firmware and the API to reach feature parity (mostly, some features I do not care about since the university doesn't use them) with the old software, the status quo, while still keeping some nice improvements, like the API being multi-threaded and asynchronous by default, and the firmware using a more modern build system/development environment (PlatformIO), moving away from a custom serialization protocol to use Flatbuffers and using a real-time operating system more common in the academic world (FreeRTOS over ChibiOS).

The progress can be tracked on GitHub at https://github.com/Uhrbaan/fripuck2 (at the time of writing, the table is mostly empty and the README.md isn't even fully finished yet).

Ideally, if I have the time, I would like to add new features as well, like a full audio stream from the robot to the clients, which would enable voice commands; a Lua VM to make the robots work offline; or even audio playback, which could make the robots talk, maybe transforming them into AI assistants, who knows! 🤷 Another big goal would be to increase the video playback speed, but I doubt it is possible to achieve more than 10 or 15 frames per second.

What have I achieved so far?

Right now, most of the foundations have been laid out. I have a rather precise vision of the architecture of the whole system; the firmware is working, the Python API is working, and the robot can send and receive packets serialized as FlatBuffers. The only important foundational work that is remaining is managing the commands coming from the client.

Once that is working, there will be a lot of work to re-add all the sensors, although I will probably be able to use a lot of the existing code to achieve this.

What are you working on right now?

Currently, I am testing the telemetry process (the robot reads a sensor, packages it, sends it over the network, and the client receives it) by implementing the simple time-of-flight sensor and sending that data over the network. Once that is working, I will proceed to work on the commands.

Wrapping up

So far, I've been really enjoying the process. C was the first language I ever learned, and I hope this project is going to elevate my C skills to the next level. I am also having fun discovering the world of embedded programming, although I don't find it as welcoming as other domains, since documentation and tutorials aren't as readily available. I often find myself having to read through multiple example projects to understand what I am supposed to do, but on the bright side, code reading and comprehension is equally as important of a skill to train as writing it (since AIs are going to take that away apparently 🤷).

Next month, I'll probably go a bit more into the architecture I've planned and some technical challenges I've come across. Anyway, if you stayed through the whole text, thank you for your time !

I’ve been using the Slimbook EVO 14 for a few days now, and here are my impressions. This is also a test of writefreely—let’s see how it goes! 😉

My Old Laptop

As a computer science (and biology) student, I mainly use my laptop for taking notes and doing homework. Beyond that, I’m a Linux hobbyist and enjoy programming for fun.

Before switching to the Slimbook, I used a Lenovo Ideapad C340 14'' Intel with 1TB of storage and 16GB of RAM. While it served me well for about six years, several issues became hard to ignore:

  • Screen quality: The 1080p resolution was too low for comfortable text reading, and the viewing angles were poor.
  • Battery life: The 40Wh battery degraded over time, lasting only about 1.5 hours in power-saving mode by the end.
  • Graphics performance: The integrated GPU struggled with anything beyond lightweight games (like Minecraft at 720p) and limited external 4K displays to 30Hz.
  • Build quality: The chassis cracked in places, and I had to use duct tape to hold the hinges together.
  • Keyboard failure: An entire row of keys stopped working, rendering the laptop unusable without an external keyboard.

Choosing a New Laptop

My new laptop needed to meet the following criteria:

  • Better performance
  • More RAM
  • Improved screen
  • Under 1,000 CHF
  • Good Linux support
  • From a European company (here’s why)

These last two points narrowed my options to Tuxedo and Slimbook. Since I carry my laptop all day, I wanted something under 15''. This left me with the Slimbook EVO and the Tuxedo InfinityBook—identical machines in terms of specs. I chose the Slimbook EVO because it was cheaper and came with GNOME preinstalled.

Review

Hardware

The Slimbook EVO feels well-built, especially compared to my old laptop. The aluminum chassis is sturdy and premium. The screen is a significant upgrade: better viewing angles and resolution, though the scaling is a bit awkward. At 100%, everything is too small; at 200%, too large. Fractional scaling works, but may affect battery life. The 120Hz refresh rate is smooth, but I disabled it to save power—it’s not essential for my workflow.

The only downgrade from my previous laptop is the lack of a touchscreen, but since I use an external drawing tablet, it’s not a dealbreaker.

Performance-wise, this laptop is a breath of fresh air. It boots in under five seconds, handles Minecraft at full resolution (with shaders!), and supports 4K displays at 60Hz. My model has 32GB of RAM and 500GB of storage. The extra RAM is a relief, and while the storage is half of what I had before, 500GB is more than enough for my needs.

Software

Buying from a Linux-first vendor means most drivers are preinstalled. However, I decided to install Ubuntu 25 from scratch—perhaps not the smartest move. The installation went smoothly, but I had to manually install a few packages, like the Ethernet driver (guide here).

Facial recognition via howdy doesn’t work yet, as it depends on a library not yet ported to Ubuntu 25. For now, I’ll stick with typing my password.

I also replaced Slimbook’s slimbook-battery (which uses TLP) with power-profiles-daemon for better GNOME integration. I might revisit this later to see if TLP offers better battery life.

Speaking of battery, I capped the charge at 80% in the BIOS to extend its lifespan. It’s reassuring that Slimbook sells replacement batteries, which could be useful down the line.

Final Thoughts

I’m happy with my purchase and would recommend the Slimbook EVO 14—especially if you value Linux support and European manufacturing.

Note: This text was re-phrased with AI (Le Chat by Mistral.ai to be precise).